Showing posts with label Developer. Show all posts

Thursday, November 8, 2012

Tiering of BLOB data in SharePoint – StorageEdge is the BOMB

So recently I completed a FANTASTIC project for a cloud based provider I was managing projects for.

We were looking at tiering data storage at the SAN level using technology like the 3PAR from HP or a V7000 from IBM.

We even considered using a product called SAN SYMPHONY (we may still use this) to create our own SAN auto tiering solution with Bring Your Own Disk type setups.

BUT

We decided to do the tiering at the application level within SharePoint and provide an even more granular approach to charging out the varying tiering of storage.

We picked StorageEdge from Alachisoft and it is BRILLIANT. This almost completes the Document Library abilities of SharePoint.

Below is a copy of the info from the main website which can be found at :

Optimize SharePoint Storage & Performance

image

StorageEdge optimizes SharePoint storage by moving all docs/BLOBs out of the database with EBS/RBS and therefore reducing the database size to manageable levels. And, it lowers your storage cost by archiving SharePoint docs to cheaper storage. And, it significantly improves SharePoint performance by caching its BLOBs and lists.

BLOB Externalization (EBS / RBS)

  • File system, SAN, NAS, & Cloud
  • Filters on BLOB externalization
  • Scheduling & Throttling
  • Preserve file & folder structure
  • Gzip compression
  • 64bit and 128bit encryptions

Read more

In-Memory Distributed Caching

  • Cache BLOBs & Lists
  • Cache ASP.NET sessions
  • Cache View State
  • Minify & Merge JavaScript

Read more

Document Library Sharing

  • Link external doc libraries
  • No document copying needed
  • Share docs with non-SP users

Archiving to Multi-Tier Storage

  • Specify multiple storage tiers
  • Archive docs to cheaper tiers
  • Version & age based archiving

Read more

Downloads

Articles & Whitepapers

Product Videos

Product Details

Guides & Documentation

Thursday, November 1, 2012

SharePoint calendars: color coding, hover effects, etc.


Two months ago, I introduced a method to display html in list views. The purpose of this post is to extend it to calendar views.
To learn more about the method itself, please refer to the post from September 1st. And of course, I recommend that you read the whole series about the “HTML calculated column“. You may find the following posts particularly useful:
- some simple but useful examples to get started
- a troubleshooting section
- how to apply the method to the DispForm.aspx page (as this is the page your calendar items will link to)
The script
You can use this module alone, or combined with the ones for list views. The scripts are very similar, but I had to make some adjustments to deal with the specificities of ”a” tags.
view plaincopy to clipboardprint?

<script type="text/javascript">  

// 

// Text to HTML - Calendar views 

// Questions and comments: Christophe@PathToSharePoint.com 

// 

var theAs = document.getElementsByTagName("a");  

var i=0;  

var AContent = "";  

while (i < theAs.length)  

{  

try 

{  

AContent = theAs[i].innerText || theAs[i].textContent;  

if ((AContent.indexOf("<DIV") >= 0) && (AContent.indexOf("</DIV>") >= 0)) {  

var tempDIV = document.createElement ("DIV");  

tempDIV.style.cursor = "pointer";  

tempDIV.innerHTML = AContent;  

theAs[i].innerHTML = "";  

theAs[i].appendChild(tempDIV);  

}  

}  

catch(err){}  

i=i+1;  

}  

</script> 

<script type="text/javascript">
//
// Text to HTML - Calendar views
// Questions and comments: Christophe@PathToSharePoint.com
//
var theAs = document.getElementsByTagName("a");
var i=0;
var AContent = "";
while (i < theAs.length)
{
try
{
AContent = theAs[i].innerText || theAs[i].textContent;
if ((AContent.indexOf("<DIV") >= 0) && (AContent.indexOf("</DIV>") >= 0)) {
var tempDIV = document.createElement ("DIV");
tempDIV.style.cursor = "pointer";
tempDIV.innerHTML = AContent;
theAs[i].innerHTML = "";
theAs[i].appendChild(tempDIV);
}
}
catch(err){}
i=i+1;
}
</script>
A simple example
For my example (see above screenshot), I have chosen a variation of this post,  as I wanted a printable calendar. For each task, the color depends on the % complete. Here is the formula for the calculated column:
view plaincopy to clipboardprint?

="<DIV style='position:relative;'><DIV style='font-size:0px; border-top: 14px solid "&CHOOSE(INT([%]*10)+1,"red","red","OrangeRed","OrangeRed","DarkOrange","Orange","Gold","yellow","GreenYellow","LawnGreen","Lime")&";width:100%;'> </DIV><DIV style='position:absolute; top:0px;'>"&TEXT([%],"0%")&"</DIV></DIV>" 

="<DIV style='position:relative;'><DIV style='font-size:0px; border-top: 14px solid "&CHOOSE(INT([%]*10)+1,"red","red","OrangeRed","OrangeRed","DarkOrange","Orange","Gold","yellow","GreenYellow","LawnGreen","Lime")&";width:100%;'> </DIV><DIV style='position:absolute; top:0px;'>"&TEXT([%],"0%")&"</DIV></DIV>"
Most of the examples I have already published for list views will also apply to calendar views. I have already shared a couple screenshots here.
My demo site also features a US holiday calendar with hover effects based on this method.
Important notes
- if you combine the scripts for list views and calendar views, you’ll need to put the script for calendar views first.
- During my tests, I have uncovered several issues with SharePoint calendars. I am keeping an ongoing list here.
- As the method is based on calculated columns, it has some limitations (see here for more details). For example you cannot include a lookup field in a formula.
- In SharePoint calendar views, items are displayed as hyperlinks to the display form (DispForm.aspx). The hyperlink will take precedence over hyperlinks you include in your formula.
- for short events (30 min or less), SharePoint provides limited space in the day and week views. Take this into account in your design.
Special thanks to Peter and Greg who sent me a detailed report of their tests to validate the script.
The next step will be to apply the method to preview panes.

Tuesday, October 30, 2012

A Tiny cute SharePoint calendar

(Part I)


Have you noticed these cute month calendars that people sometimes put on the homepage of their Website?
Now, have you tried to drop a SharePoint month calendar on the home page of your SharePoint site? The result… not so cute: the calendar eats up half of the screen.
In this post I am going to show how with the help of CSS you can shrink your SharePoint calendar and make it fit in the right column of a SharePoint page. The picture shows you the expected result.
So let’s start by dropping on our right column a monthly view of the calendar and a hidden Content Editor Web Part.


In the source editor of the CEWP, paste the code below:
<style type="text/css">
/* Tiny Calendar */
/* Christophe@PathToSharePoint.com */
/* Remove week blocks */
.ms-cal-weekempty {display:none;}
.ms-cal-week {display:none;}
.ms-cal-weekB {display:none;}
/* Shrink cells */
.ms-cal-workitem2B {display:none;}
.ms-cal-noworkitem2B {display:none;}
.ms-cal-nodataBtm2 {display:none;}
.ms-cal-todayitem2B {display:none;}
.ms-cal-workitem {font-size:0px;}
.ms-cal-muworkitem {font-size:0px;}
.ms-cal-noworkitem {font-size:0px;}
.ms-cal-nodataMid {font-size:0px;}
.ms-cal-todayitem {font-size:0px;}
/* thin out header */
.ms-cal-nav {display:none;}
.ms-cal-nav-buttonsltr {display:none;}
.ms-cal-navheader {padding:0px;spacing:0px;}
.ms-calheader IMG {width:15px;}
/* Abbreviate weekdays */
.ms-cal-weekday {letter-spacing:6px; width:22px; overflow: hidden;}
</style>
What this CSS does:

height:
- Reduce the height of the calendar cells
- Reduce the height of the header

width:
- Only keep the first letter of the weekday names
- Simplify the header options to just keep previous and next month
- Reduce the “bone” that forces the width of the header
- Remove the week boxes to the left of the calendar

Note that if you click on a day, SharePoint will open a full size day view of your calendar – I have chosen to keep this as the expected behavior. If you don’t like it you can simply deactivate the JavaScript that triggers the day view.
We now have our cute calendar that tells us that today is October 6 and that October 28th is a Tuesday.
The next step is to display the list items, so that I know for example that Halloween is on October 31st. This will be the object of part II. Of course, we’ll have to accept some constraints because of the reduced size of the calendar.
Update [Feb 6, 2009]: several people asked about the bottom border. To get it, in the Web Part settings select:
Appearance | Chrome type | border only.
Update [Jan 22, 2009]: the above stylesheet is for SharePoint 2007. For SharePoint 2003, you can try this:
<style type="text/css">
/* Tiny Calendar - SharePoint 2003 */
/* Christophe@PathToSharePoint.com */
.ms-calMid {height:0px;}
.ms-CalSpacer {height:0px;}
.ms-calhead {padding:0px;spacing:0px;}
</style>

(Part II)

October 11, 2008 in Content Editor Web Part, SharePoint 2007, Styles/CSS
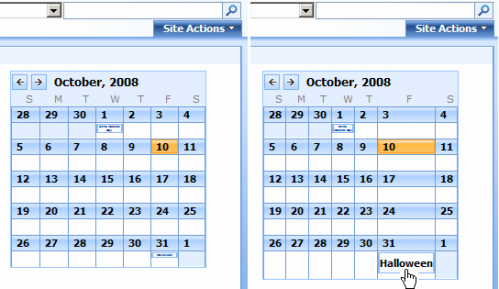

In part I, we saw how to adjust the size of an empty SharePoint month calendar to fit in the right column of our home page. Now our next step is to display the events.
As you can expect, the default display will be too big for our tiny calendar. So here are two tricks to work around this issue.
Method 1: no title display
In SharePoint 2007, you can choose which column to display in the month view. So let’s create an additional column:
- name: “Display”
- required: yes
- default value: “*”
In the view settings, choose [Display] as month view title. The result: for each event, SharePoint will display a simple “*” that will fit into the day cell.
This works fine, but the user has to click on the item to actually see the event. This may be an issue, especially if several events happen on the same day.
Method 2: shrink the title
So another option is to keep the title and use some CSS magic. Here is the deal: a title will be displayed in small fonts by default (unreadable), but will get back to normal size when the user hovers over it (see the screenshot at the beginning of this post).
To achieve this we’ll just add a few rules to the CSS from part I:
<style type="text/css">
/* Tiny Calendar */
/* Christophe@PathToSharePoint.com */
/* Remove week blocks */
.ms-cal-weekempty {display:none;}
.ms-cal-week {display:none;}
.ms-cal-weekB {display:none;}
/* Shrink cells */
.ms-cal-workitem2B {display:none;}
.ms-cal-noworkitem2B {display:none;}
.ms-cal-nodataBtm2 {display:none;}
.ms-cal-todayitem2B {display:none;}
.ms-cal-workitem {font-size:0px;}
.ms-cal-muworkitem {font-size:0px;}
.ms-cal-noworkitem {font-size:0px;}
.ms-cal-nodataMid {font-size:0px;}
.ms-cal-todayitem {font-size:0px;}
/* thin out header */
.ms-cal-nav {display:none;}
.ms-cal-nav-buttonsltr {display:none;}
.ms-cal-navheader {padding:0px;spacing:0px;}
.ms-calheader IMG {width:15px;}
/* Abbreviate weekdays */
.ms-cal-weekday {letter-spacing:6px; width:22px; overflow: hidden;}
/* events display */
.ms-cal-defaultbgcolor {padding:0;}
.ms-cal-defaultbgcolor a {font-size:3px;}
.ms-cal-monthitem a {font-size:3px;}
.ms-cal-monthitem a:hover {font-size:10px;}
</style>
This second method is more user-friendly, if your titles are not too long.
There are of course many variations around these two methods, here are for example some other text adjustments you can use:
http://www.w3schools.com/Css/css_text.asp
And remember: all of this was done using CSS only, no harm was done to the structure itself. The SharePoint calendar remains fully operational (recurring events, alerts, filters, etc.).

Thursday, September 27, 2012

A progress bar for your tasks list and Printing

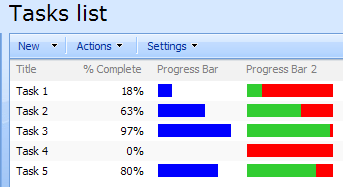
Today, let’s see how to show the progress of your tasks in SharePoint:

We’ll rely on this method: using calculated columns to write HTML. Easy, and entirely done through the SharePoint UI.
The [% Complete] is a default column in tasks lists. We just need to add - in a calculated column - the formulas for this specific use case. Here they are:
- Progress Bar:
=”<DIV style=’background-color:blue; width:”&([% Complete]*100)&”%;’> </DIV>”
- Progress Bar 2:
=”<DIV style=’background-color:red;’><DIV style=’background-color:LimeGreen; width:”&([% Complete]*100)&”%;’> </DIV></DIV>”
Note: the   character is mandatory to make this work in Firefox.
If you are looking for other colours, here is a very good reference:
http://www.w3schools.com/html/html_colornames.asp


Printable progress bars

You may have noticed that when you print lists including my examples of progress bars, the colours are not rendered. This is actually the expected behaviour: when printing Web pages, background colours are usually ignored by the browser.
So what can you do if you want to print your progress bars?
A first possibility is to modify your browser settings to print backgrounds. In Internet Explorer for example, follow this path:
Tools | Internet Options | Advanced | Printing.
A second option is to modify the formula and use colors instead of background colors, or use images. Here is an example of workaround for the above screenshot, where I used border colors (instead of background colors in the original post):
view plaincopy to clipboardprint?

="<DIV style='position:relative;'><DIV style='font-size:0px; border-top: 14px solid "&CHOOSE(INT([%]*10) +1,"red","red","OrangeRed","OrangeRed","DarkOrange","Orange","Gold","yellow","GreenYellow","LawnGreen","Lime")&"; width:"&([%]*100)&"%;'> </DIV><DIV style='position:absolute; top:0px;'>"&TEXT([%],"0%")&"</DIV></DIV>" 

="<DIV style='position:relative;'><DIV style='font-size:0px; border-top: 14px solid "&CHOOSE(INT([%]*10) +1,"red","red","OrangeRed","OrangeRed","DarkOrange","Orange","Gold","yellow","GreenYellow","LawnGreen","Lime")&"; width:"&([%]*100)&"%;'> </DIV><DIV style='position:absolute; top:0px;'>"&TEXT([%],"0%")&"</DIV></DIV>"
As usual, feel free to share your own solutions!
This behaviour was first reported to me by Peter Allen

Wednesday, August 22, 2012

Visualization – calculated color gradients..by Mark Milner

CalcGradientIf you need dynamically generated visualizations for your SharePoint data, have you considered leveraging the power of the Calculated Column? This Tuesday at 1:00pm EST, Mark Miller and I will give you all the keys to master this simple yet powerful technique. At the end of the two hour entry level workshop, you’ll be able to add color coding, KPIs and other effects – like the one described in this post – to your SharePoint lists.


Green/Yellow/Red is a standard color palette for dashboards. You can just use 3 colors to visualize discrete states, for example the status of a project (on track – drifting - late). But if your purpose is to communicate progress, or a measure on a scale, you need a larger color palette. This is for example the case in my screenshot, where the color reflects the level of completion (in %), in a tasks list.

So, how can I do this in SharePoint? Of course, my plan is to use a calculated column that will determine the color, based on the value in the [% Completed] column.

Method 1: nested IFs

This is the most basic approach:
if [% Completed]>90, select green
else if [% Completed]>80, etc.
I am not going to detail it, as we can do much better.

Method 2: CHOOSE function

The CHOOSE function is more elegant than nested IFs, and is a natural choice when dealing with multiple options. You’ll find all the explanations to achieve a color gradient in this post.

Method 3: pure calculation

So, how can we go even further? Well, colors can be identified by their name, but also by theirrgb code, as each color can be generated from a combination of red, green and blue. For example:
red: rgb(255,0,0)
green: rgb(0,255,0)
blue: rgb(0,0,255)
yellow: rgb(255,255,0)
white: rgb(255,255,255)

Using these values, we can “easily” create our red/yellow/green gradient:
rgb(255,0,0) –> rgb(255,255,0) –> rgb(0,255,0)

The following formula, entered in a calculated column, will give you the rgb value for each value of the [% Completed] column:
=”rgb(“&INT(MIN(510-[% Complete]*255*2,255))&”,”&INT(MIN([% Complete]*255*2,255))&”,0)”

To obtain the visual effect as in the screenshot, use the HTML Calculated Column method, with the following formula:

1
="<span style='display:inline-block;position:relative; width:60px; height:14px;border:1px solid;'><span style='display:inline-block;position:relative;background-color:rgb("&INT(MIN(510-[% Complete]*255*2,255))&","&INT(MIN([% Complete]*255*2,255))&",0); width:"&([% Complete]*100)&"%;height:14px;'><span style='position:absolute; top:0px;'> "&TEXT([% Complete],"0%")&"</span></span></span>"

Wednesday, June 13, 2012

SharePoint Calculated Columns :: Getting TODAY as a Calculated Column in a Custom List

You can trick SharePoint into creating a column for today’s date which you can then compare today’s date to another date (in this case revised date).

As a result, I created a column for “Today”, with single line of text and then created another calculated column “CalcToday” and set it equal to the “Today” column.

Once I was done I deleted the “Today” column and voila! You have a column which is set to the current date!

Then I just created the “Days Overdue” column which compares date information from certain items to be addressed/completed (a.k.a”Revised Date”) to “CalcToday”.

Monday, May 14, 2012

Free SharePoint Website for trying stuff out

I know there is now Office 365 accounts but sometimes you don’t want all the clutter of that product.

So here is a free website you can play with. Enjoy Smile

image

http://www.freesharepoint.com/

Saturday, April 21, 2012

SharePoint HTML Calculated Column and Unicode Graphics

The number one application of the ”HTML Calculated Column” method is the display of visual indicators in SharePoint lists. You’ll find many examples on my blog:
- KPIs
- Progress bars
- Color gradients
- etc.

If you haven’t used this method yet, you’ll need to learn it to take advantage of these tutorials. For the latest information on the HTML Calculated Column, start with this post… or attend one of our live online workshops.

Most examples are about color coding backgrounds or text. But what if you want to take it a little further? For example display:
- up/down arrows ➘➙➚
- check marks ✗✓
- star ratings ✭✭✭✭✭
- traffic lights ✹✹✹ ✹✹✹ ✹✹✹
- etc. ✉☎☀☁

What immediately comes to mind is to use a set of icons. But the above examples offer a lighter solution: welcome to the world of unicode graphics!

Unicode is an international standard that references character sets. This includes some graphics, see for example the page below:
http://www.alanwood.net/unicode/index.html
For the graphics, scroll down to the “Symbols” category.

Some benefits of unicode, compared to icons:
- unlimited choice of colors, for both the graphic and the background.
- the rendering is not bound to an external image. This means better performance. Also, it makes it easier to save the SharePoint list as template for reuse in other environments (I’ll provide such a template in an upcoming post).

An example: traffic lights

As an example, here is the formula I used in a calculated column to generate the above traffic lights:

1
="<span style='background-color:black;font-size:24px;'><span style='padding:-10px;color:"&IF([Color]="Green","green;'>✹","gray;'>✹")&"</span><span style='padding:-10px;color:"&IF([Color]="Amber","RGB(255, 191, 0);'>✹","gray;'>✹")&"</span><span style='padding:-10px;color:"&IF([Color]="Red","red;'>✹","gray;'>✹")&"</span></span>"

Where the [Color] column can take the values Green, Amber or Red.

How about Wingdings?

Why use unicode characters, and not simply fonts like Webdings, Wingdings, or Zapf Dingbats? Those too offer graphics, but there is a downside: these fonts are not standard, and they don’t work cross-browser (and never will, from what I read). Such graphic fonts could still work for you if you are in a corporate environment where your internal policy enforces the use of Internet Explorer.

Unicode seems to work in all modern browsers. I tested it in IE7, IE8, Firefox, Chrome and Safari.

Monday, March 5, 2012

A Great Video on SharePoint 2013

Hey everyone, no doubt you have heard that SharePoint is getting a facelift as the RTM version of SharePoint 2013 is now in production.

Here is a great YouTube video on what is coming…

http://www.youtube.com/watch?v=yD6ebRtjn5M 

Whats new in Sharepoint 2013 Preview

Thursday, January 19, 2012

Training for SharePoint

So you want to learn more?

Below are some ways to accelerate your knowledge in SharePoint.

http://www.testking.com/ - Download actual exams for various supplier

http://sharepointtests.blogspot.co.nz/ - Blog on sharepoint

http://joelblogs.co.uk/practice-exams/ - Practice exams

The Practice exam above.
This exam has 43 questions that are SharePoint 2010 developer specific in C#, in the style of the Microsoft 70-573 exam – “TS: Microsoft SharePoint 2010, Application Development”.
These are not questions from Microsoft, MeasureUp, Self-Test or any other vendor.