Tuesday, July 10, 2012
SharePoint Calculated Columns :: Start and End Times
My custom CT (content type) is called Process Step. (The parent CT is Issue.) The purpose of the list is to allow loading of a series of steps (the same set for each month) and track the time it takes to complete each step, focusing on those identified as "key steps."
As I said, I added "start time," "end time" and "duration" to my content type. Start time is a date/time field which populates off a WF that uses "set list item" action to drop the date/time corresponding to "modified" which occurs when the item status changes from "not started" to "in progress." The same thing happens when status changes from "in progress" to "completed" - another WF updates "end time" to copy over whatever was the "modified" date/time matching that change.
"Duration" is a calculated column derived from end time minus start time, single line of text type, using this formula:
=TEXT([End time]-[Start time],"h:mm:ss")
The result of the calculation appears in the hours:minutes:seconds format
I want to provide a way to measure the duration against a target duration; therefore, the values I enter for each step as my target duration must also be in the hours:minutes:seconds format- correct?
Assuming that can be created, I then want one more calculated column )"duration comparison") which will compare the actual duration with the target duration. I am fuzzy on how to display this, however... I'm not sure what the best comparison format would be (a difference, a ratio, not sure). So I don't know what type of field to use. I think it will depend on how the target duration field is formatted.
Finally, I will create a view to display only the "key steps" and set up a KPI that lets me see the key steps' duration comparison values.
Is that the info you need?
Ok, starting to make sense now.
Everything sounds good so far...the "Duration" column should be returning a value in the "h:mm:ss" format (which it sounds like it is).
So, to add in a "Target Duration", you can just create a new "Single line of text" column and literally enter in the values in the same "h:mm:ss" format (i.e. 2.5 hrs would be 2:30:00). Do this for each step you want to track. (Q: are there any issues with manually entering in this data?)
For the "Duration Comparison" column, just use a Calculated column with a return type of "Single line of text" and a formula something like:
=IF(TEXT([Actual Duration],"HH:MM:SS")<TEXT([Target Duration],"HH:MM:SS"),TEXT([Target Duration]-[Actual Duration],"HH:MM:SS")&" Under",TEXT([Actual Duration]-[Target Duration],"HH:MM:SS")&" Over")
This formula would be read as: "If the text of the 'Actual Duration' column formatted as a standard 'hh:mm:ss' time format is less than the text of the 'Target Duration' column formatted as a standard 'hh:mm:ss' time format, subtract the 'Actual Duration' column from the 'Target Duration' column formatted as a standard 'hh:mm:ss' time format, followed by the text 'Under'. If not, subtract the 'Target Duration' column from the 'Actual Duration' column formatted as a standard 'hh:mm:ss' time format, followed by the text 'Over'."
This would display (using example data):
Start Time: 9:00:00
End Time: 9:45:00
Actual Duration: 00:45:00
Target Duration: 1:30:00
Duration Comparison: 00:45:00 Under
Getting a bit trickier, you could use an alternate formula of:
=IF(TEXT([Actual Duration],"HH:MM:SS")<TEXT([Target Duration],"HH:MM:SS"),HOUR([Target Duration]-[Actual Duration])&" hrs "&MINUTE([Target Duration]-[Actual Duration])&" min "&SECOND([Target Duration]-[Actual Duration])&" sec Under",HOUR([Actual Duration]-[Target Duration])&" hrs "&MINUTE([Actual Duration]-[Target Duration])&" min "&SECOND([Actual Duration]-[Target Duration])&" sec Over")
This would display it as:
Start Time: 9:00:00
End Time: 9:45:00
Actual Duration: 00:45:00
Target Duration: 1:30:00
Duration Comparison: 0 hrs 45 min 0 sec Under
This one parses out the individual hours/minutes/seconds into a more "textual" display rather than the "hh:mm:ss" style display, but either version would work.
The custom view portion should be pretty straight-forward, but does this help with the rest?

Wednesday, June 13, 2012
SharePoint Calculated Columns :: Getting TODAY as a Calculated Column in a Custom List
You can trick SharePoint into creating a column for today’s date which you can then compare today’s date to another date (in this case revised date).
As a result, I created a column for “Today”, with single line of text and then created another calculated column “CalcToday” and set it equal to the “Today” column.
Once I was done I deleted the “Today” column and voila! You have a column which is set to the current date!
Then I just created the “Days Overdue” column which compares date information from certain items to be addressed/completed (a.k.a”Revised Date”) to “CalcToday”.
Monday, May 14, 2012
Free SharePoint Website for trying stuff out
I know there is now Office 365 accounts but sometimes you don’t want all the clutter of that product.
So here is a free website you can play with. Enjoy


Saturday, April 21, 2012
SharePoint HTML Calculated Column and Unicode Graphics
The number one application of the ”HTML Calculated Column” method is the display of visual indicators in SharePoint lists. You’ll find many examples on my blog:
- KPIs
- Progress bars
- Color gradients
- etc.
If you haven’t used this method yet, you’ll need to learn it to take advantage of these tutorials. For the latest information on the HTML Calculated Column, start with this post… or attend one of our live online workshops.
Most examples are about color coding backgrounds or text. But what if you want to take it a little further? For example display:
- up/down arrows ➘➙➚
- check marks ✗✓
- star ratings ✭✭✭✭✭
- traffic lights ✹✹✹ ✹✹✹ ✹✹✹
- etc. ✉☎☀☁
What immediately comes to mind is to use a set of icons. But the above examples offer a lighter solution: welcome to the world of unicode graphics!
Unicode is an international standard that references character sets. This includes some graphics, see for example the page below:
http://www.alanwood.net/unicode/index.html
For the graphics, scroll down to the “Symbols” category.
Some benefits of unicode, compared to icons:
- unlimited choice of colors, for both the graphic and the background.
- the rendering is not bound to an external image. This means better performance. Also, it makes it easier to save the SharePoint list as template for reuse in other environments (I’ll provide such a template in an upcoming post).
An example: traffic lights
As an example, here is the formula I used in a calculated column to generate the above traffic lights:
1="<span style='background-color:black;font-size:24px;'><span style='padding:-10px;color:"&IF([Color]="Green","green;'>✹","gray;'>✹")&"</span><span style='padding:-10px;color:"&IF([Color]="Amber","RGB(255, 191, 0);'>✹","gray;'>✹")&"</span><span style='padding:-10px;color:"&IF([Color]="Red","red;'>✹","gray;'>✹")&"</span></span>"
Where the [Color] column can take the values Green, Amber or Red.
How about Wingdings?
Why use unicode characters, and not simply fonts like Webdings, Wingdings, or Zapf Dingbats? Those too offer graphics, but there is a downside: these fonts are not standard, and they don’t work cross-browser (and never will, from what I read). Such graphic fonts could still work for you if you are in a corporate environment where your internal policy enforces the use of Internet Explorer.
Unicode seems to work in all modern browsers. I tested it in IE7, IE8, Firefox, Chrome and Safari.
Friday, March 23, 2012
SharePoint Calculated Column :: Set default date to first day of the current month
This is small requirement I received to make a date column in a list and make it to
default to the first day of the current month.
I'm sure that for most of you it will not be something difficult to do, but for those struggling here are the steps:
1. create a date type column.
2. In the default value of this column to the following formula
=DATE(YEAR(Today),MONTH(Today),DAY("1-Apr-2008"))
instead of "1-Apr-2008" you might want to use any date that reflects the first day of the month, DAY() function will extract the needed number 1.
Monday, March 5, 2012
A Great Video on SharePoint 2013
Hey everyone, no doubt you have heard that SharePoint is getting a facelift as the RTM version of SharePoint 2013 is now in production.
Here is a great YouTube video on what is coming…
http://www.youtube.com/watch?v=yD6ebRtjn5M
Whats new in Sharepoint 2013 Preview
Tuesday, February 21, 2012
Mapping a local drive letter to a SharePoint Document Library
Drive mapping can be created to any SharePoint document library to facilitate document management using the standard Windows Explorer applet (rather than the more cumbersome Internet Explorer (IE) interface.

a. Note the URL for the SharePoint library; the one for the above is:
https://companyweb.alleycat.org/ACA/admin/NetAdmin/Shared%20Documents/Forms/AllItems.aspx
b. The critical portion of the URL is the part up to the /Forms…; that is;
https://companyweb.alleycat.org/ACA/admin/NetAdmin/Shared%20Documents
c. Also note the “%20” characters – these characters represent a “space” character for WEB browser text strings. We will replace these characters with the actual space character for the mapping operation.
2. Open up Windows Explorer (WE)
and select the Tools menu and then “Map Network Drive…” item. You will see the Map drive dialogue box shown below:


Drive letter W: has been selected as shown above.
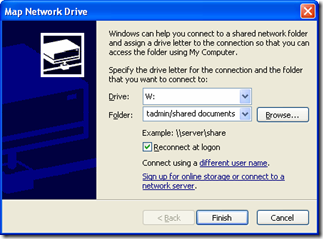
a. Note: http: is used instead of https:; this seems to work more reliably for this procedure.
b. Note: the “Reconnect at logon” checkbox is checked so this mapping will be retained until you decide to disconnect the drive mapping at some future date.

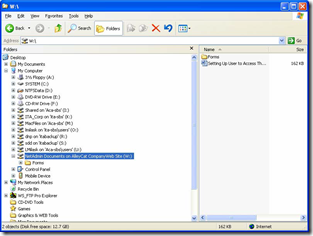
b. Close the Window and return to the main WE window; you should now see the newly mapped drive as shown below

c. You can now right-click on the new mapping and select the “Rename” entry from the pop-up menu. Rename the mapping to better identify its SharePoint folder location:
a. Right-click on the drive mapping in WE and select the “Disconnect” entry


That’s it! However, if you have problems, refer to the trouble=shooting tips that follow.
Remote Users
1. Remote users should be connected to the main office system with a VPN connection for the most consistent behavior. This is actually not necessary, but it VPN connectivity sets up a complete environment that includes finding network resources and WEB access.
2. Make sure you have the Proxy settings set up for the VPN connection:
a. Open IE and select the Tool/Internet Options menu item:

b. Select the Connections tab; you will see the “Dial-up and Virtual Private Network settings box as shown below. Highlight you VPN connection entry and click the Settings button to the right of the box.
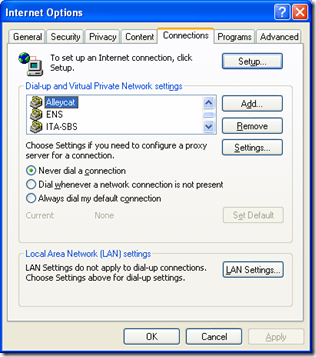
c. Note the Proxy server section shown below: Make sure you have the same entries as show below.

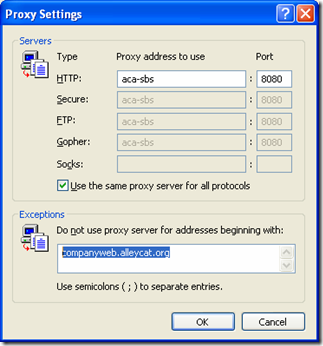
d. Next, click the Advanced button to see the following screen:
1. Select the Tools/Internet Options menu item as shown below:
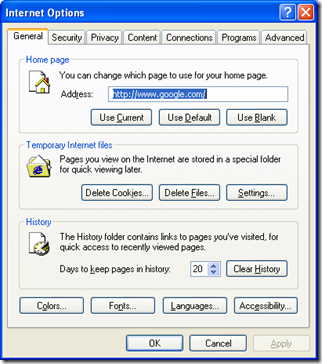
2. Select the Security tab and Trusted sites item. Click the Sites… button.

3. Enter the https://Companyweb.alleycat.org address as shown below and click the Add button:

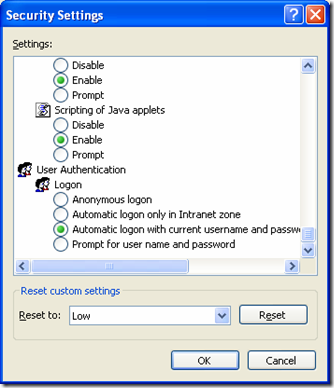
4. Click OK to return to the previous screen. Next click the Custom level… button to see the following screen:

5. Scroll to the bottom of the list of options to the User Authentication/Logon section. Make sure the third Logon option is selected: “Automatic logon with current username and password.”
a. Note: This assumes that you have used your domain user name and password for your local system profile.
The WEB Client service provides the support necessary for mapping SharePoint WEB sites and libraries. Occasionally, this service may become disabled. If you obtain “network cannot be found” messages when trying to map SharePoint resources, check to see if the WEB Client service has been disabled as follows:
1. Open Control Panel from the Start menu and double-click the Administration Tools item.

2. From the Administrative Tools screen; double-click the “Services” entry:

3. Scroll down the services list and find the WebClient entry:
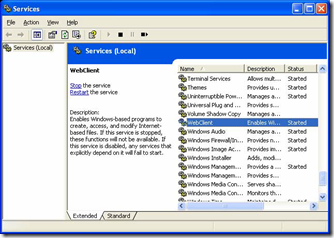
4. It’s Status should be “Started.” If it is not, double-click the entry and set the Startup Type: to “Automatic.” You can then click the Start button to start the service.
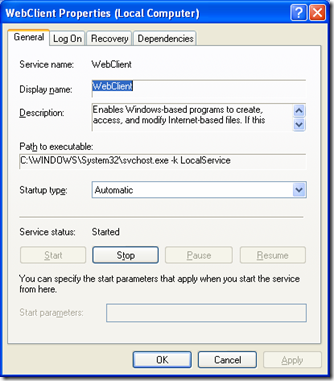
5. Close all the Windows and try the Mapping procedure again.
Prerequisites:
Windows XP is required (or a WEBDEV updated Windows 2000) operating system.Mapping Procedure:
1. Use Internet Explorer (IE) to navigate to the desired SharePoint Library. The screen below shows an example library:
a. Note the URL for the SharePoint library; the one for the above is:
https://companyweb.alleycat.org/ACA/admin/NetAdmin/Shared%20Documents/Forms/AllItems.aspx
b. The critical portion of the URL is the part up to the /Forms…; that is;
https://companyweb.alleycat.org/ACA/admin/NetAdmin/Shared%20Documents
c. Also note the “%20” characters – these characters represent a “space” character for WEB browser text strings. We will replace these characters with the actual space character for the mapping operation.
2. Open up Windows Explorer (WE)
and select the Tools menu and then “Map Network Drive…” item. You will see the Map drive dialogue box shown below:

3. Next select the drop-down menu arrow
to the right of the Drive entry box and select an available drive letter of your choice:

Drive letter W: has been selected as shown above.
4. Now TYPE (do not cut and past) the SharePoint folder URL as shown below:
http://companyweb.alleycat.org/ACA/admin/NetAdmin/Shared Documents
a. Note: http: is used instead of https:; this seems to work more reliably for this procedure.
b. Note: the “Reconnect at logon” checkbox is checked so this mapping will be retained until you decide to disconnect the drive mapping at some future date.
5. Click the Finish button to complete the mapping process.
a. After a brief period of time an Explorer window will pop-up showing the new mapped SharePoint folder:
b. Close the Window and return to the main WE window; you should now see the newly mapped drive as shown below

c. You can now right-click on the new mapping and select the “Rename” entry from the pop-up menu. Rename the mapping to better identify its SharePoint folder location:

6. Removing the SharePoint mapping.
a. Right-click on the drive mapping in WE and select the “Disconnect” entry


That’s it! However, if you have problems, refer to the trouble=shooting tips that follow.
Trouble-Shooting Tips
Various Windows setup issues might interfere with the mapping process. Here are several things to consider if you experience problems.Remote Users
1. Remote users should be connected to the main office system with a VPN connection for the most consistent behavior. This is actually not necessary, but it VPN connectivity sets up a complete environment that includes finding network resources and WEB access.
2. Make sure you have the Proxy settings set up for the VPN connection:
a. Open IE and select the Tool/Internet Options menu item:

b. Select the Connections tab; you will see the “Dial-up and Virtual Private Network settings box as shown below. Highlight you VPN connection entry and click the Settings button to the right of the box.

c. Note the Proxy server section shown below: Make sure you have the same entries as show below.

d. Next, click the Advanced button to see the following screen:

e. Note the entry in the Exceptions box. This entry provides direct internal access to the CompanyWeb site.
f. OK out of the windows to complete the process.
Internet Security Settings
The SharePoint WEB site uses authentication security to allow access to the site and to various documents in Libraries. You can avoid the need to enter you user name and password repeatedly by making the following settings to the Security settings in IE.1. Select the Tools/Internet Options menu item as shown below:

2. Select the Security tab and Trusted sites item. Click the Sites… button.

3. Enter the https://Companyweb.alleycat.org address as shown below and click the Add button:

4. Click OK to return to the previous screen. Next click the Custom level… button to see the following screen:

5. Scroll to the bottom of the list of options to the User Authentication/Logon section. Make sure the third Logon option is selected: “Automatic logon with current username and password.”
a. Note: This assumes that you have used your domain user name and password for your local system profile.

WEB Client (WEBDev) Service
The WEB Client service provides the support necessary for mapping SharePoint WEB sites and libraries. Occasionally, this service may become disabled. If you obtain “network cannot be found” messages when trying to map SharePoint resources, check to see if the WEB Client service has been disabled as follows:
1. Open Control Panel from the Start menu and double-click the Administration Tools item.

2. From the Administrative Tools screen; double-click the “Services” entry:

3. Scroll down the services list and find the WebClient entry:

4. It’s Status should be “Started.” If it is not, double-click the entry and set the Startup Type: to “Automatic.” You can then click the Start button to start the service.

5. Close all the Windows and try the Mapping procedure again.
Subscribe to:
Posts (Atom)